Using Nginx as a Reverse Proxy for Containerized Node.js Microservices

Today I will be discussing how to quickly setup a microservices architecture using Node.js, Nginx, Docker and Angular (well you could use any client side framework/library like React.js, Vue.js — but I chose Angular for simplicity purposes).
So here is a brief summary of what we’ll be doing today:
- Setup 2 basic express.js servers exposing pretty basic enpoints
- Setup the nginx configuration for these servers(each server here refers to a microservice)
- Dockerize these servers including setting up the nginx web server as a docker container and running the entire workload through docker-compose
- Test our endpoints in postman
- Setup an Angular client and dockerize it
- Modify the Nginx configuration to contain the client’s configuration
But before getting started, one might wonder, what is reverse proxy and why would we even need it?
A reverse proxy server is a type of proxy server that typically sits behind the firewall in a private network and directs client requests to the appropriate backend server.
So in plain simple terms, when we setup a microservice architecture, we would want our client requests to be forwarded to the concerned microservice according the route patterns. For e.g. the requests of the form /auth/ should be routed to the authentication microservice. Similarly the requests of the form /payments/ should be forwarded to the payment microservice and so on and so forth. So typically you have many options to set this up based on the tech stack you’re using. For example -
- If you’re using SpringBoot, you can use Netflix Eureka as a service discovery along with Spring Cloud Gateway to forward your requests(and later deploy those microservices as docker containers or kubernetes pods based on your requirements).
- If you’re implementing a serverless architecture(let’s say on AWS), you could use AWS Service Mesh and Service Discovery.
- If you’re using Node.js, you could setup a load balancer and revevrse proxy using Nginx — which is what we’ll be doing in this article. Please note:
Above mentioned methods are some of the ways which are robust and I have known from my experience to be used in several production systems. Ofcourse they’re NOT the only way to setup a Gateway/Loadbalancer/Reverse Proxy. Feel free to explore or find services suitable to your use case on the web.
So without further ado, let’s get to the first step: setting up two basic express.js servers.
For that, just fire up your terminal and type:
npm init -yNext install express.js and cors package (cors is needed because we’ll be making requests from an Angular app eventually) with the command:
npm i --save express corsYou can look up the exact folder structure in the GitHub repo shared at the end of this article. I would suggest going through the repository as you read through this article to make more sense as I won’t be diving deep into the coding part here.
Note that we will be running the above commands twice inside the folders server1 (represents our 1st microservice) and server2 (represents our 2nd microservice). We’ll also setup some basic ‘get’ routes in these microservices.
These can be any distinctive message that you might want to try out. Feel free to setup those up according to your own requirements. After setting up these 2 microservices, the app.js file for the 1st microservice looks like this:
Similarly the app.js for the 2nd microservice looks like this:
As you can see, nothing fancy going on here. Just 2 simple servers with slightly different response messages.
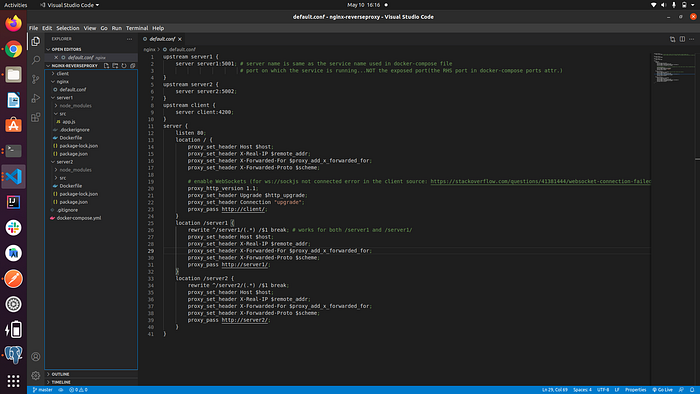
Next we’ll create a new folder named nginx in the project root and create a file called default.conf inside it.
This file is supposed to contain all the load balancing and reverse proxy configuration for our microservices. The configuration file looks as follows:
All the above configurations are pretty much basic and you can find the details about specific statements(or terms) on the official website here. Please note that here we are just configuring the “reverse proxy” part and have NOT explicitly setup any load balancing. I have intentionally left it due to -
- The setup is simple with minor changes to the above configuration.
- There are several other ways to setup load balancers when it comes to deploying our containers(especially docker/kubernetes containers) such as cloud load balancers.
Now we’re done with the configuration of the backend except for the docker files.
Let’s set them up real quick. You have to put the Dockerfiles inside the respective folders for the servers(or microservices) and the docker-compose.yml file in the project root.
The final folder structure looks like this(ignore the client folder for now):
Here are the Dockerfiles for server1 and server2 and the docker-compose file.
Dockerfile for server1:
Dockerfile for server2:
Docker-compose file:
As you can see, nothing fancy/complicated going on around here. Pretty basic stuff — if you know the basics of docker and containers you should be able to understand these files at the first glance. Now that we have our files setup, we can run our servers as containers by running the following command in the project root:
docker-compose up --build -dThis command pulls the images and fires our containers. It might take a little while depending on your network bandwidth. But once done, you’ll be able to see your containers running by typing docker container ls OR docker ps
Having said that, let’s open Postman and test our endpoints.
Now according to our reverse proxy configuration, we should be able to hit http://localhost:8080/server1/app and http://localhost:8080/server2/app (note how we’re only changing the urls as per the server names while the base url remains same) to get responses from both our servers.
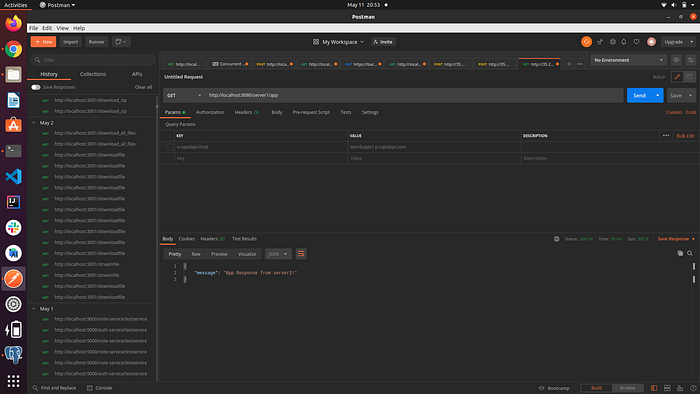
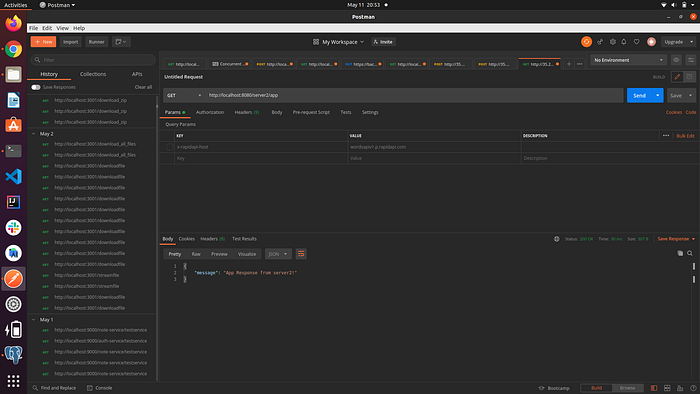
Yay! we are getting the responses from our servers and you know what? The heavy lifting is done!
Now we have to configure a client(well it could be any client actually). My personal preference was Angular, but you could have any other Library/Framework as per your choice and requirements.
The concept remains the same. But in case you choose Angular, feel free to browse the repository to see what all I’ve done(there is nothing much going there actually…I am just fetching the response from the servers and displaying them in different components…that’s it). I am intentionally skipping that part here in this article so that it doesn’t become too verbose.
I will share the updated default.conf file, the docker-compose file and the Dockerfile for the client though.
Here is the Dockerfile for the client:
The only tricky part here is the last line i.e ng serve --prod --host 0.0.0.0 which is specific to Angular in order to make the client container accessible from any network (in our case it helps access the client from a browser). You can explore ways to access the client if you’re using a different framework.
The updated default.conf file is:
And the final docker-compose.yml file is:
So that’s pretty much for our setup. Once all these things are included, you can run the docker-compose up command again to start all the containers. In my case the response from client(and the running client) looks like this:


Update - 26/06/2022:
I have updated the github repo to contain the deployment for kubernetes as well for all the microservices along with ingress controller. You can find the files in the “k8s” branch. I have only setup to run the microservices on minikube. The implementations however to run on different cloud service providers like AWS/GCP/Azure will be different. I leave it to the readers to explore that.
Update - 26/12/2022:
Have modified the default.conf files for nginx. Just removed some unnecessary headers. Hope that’s helpful.
Conclusion
So that’s all folks.
You see how nginx and docker make a developer’s life so easy! You can checkout the GitHub repo here:
Cheers!
More content at PlainEnglish.io. Sign up for our free weekly newsletter. Follow us on Twitter, LinkedIn, YouTube, and Discord. Interested in Growth Hacking? Check out Circuit.